The full walkthrough of Glass Maker for Canva: Photo glass frames and all 5 effects (Frosted, Glass block, Fluted, Cracked, Stained), Text glass, Export design, and Pro.
This is the complete, step-by-step guide to Glass Maker — both tabs (Photo glass for placing glass panes on images, Text glass for 3D glass lettering) plus the Export design workflow for applying glass to anything that isn’t a photo.
Glass Maker in Canva with its two tabs: Photo glass and Text glass
Open a design that contains an image (an upload or a Canva stock photo). In the left sidebar, click the Glass Maker icon — or open Apps and search for “Glass Maker”. The panel opens on the Photo glass tab, with Text glass next to it and your plan status line at the bottom.
2
Skim 'How it works' if you're new
Press How it works at the bottom of the panel for a built-in Q&A — how the app works, why Start glass effect might be disabled, how to use glass with graphic elements — and a link to the tutorial video. Press ← to come back.
The How it works screen answers the most common questions
Click an image on your page — it appears as a thumbnail under “Select an image in your design”. Press Start glass effect.
The selected photo shows in the panel; Start glass effect opens the editor
Photo glass only detects image elements. For graphics, stickers, text, or a whole page, use Export design first.
2
The editor opens with a default glass frame
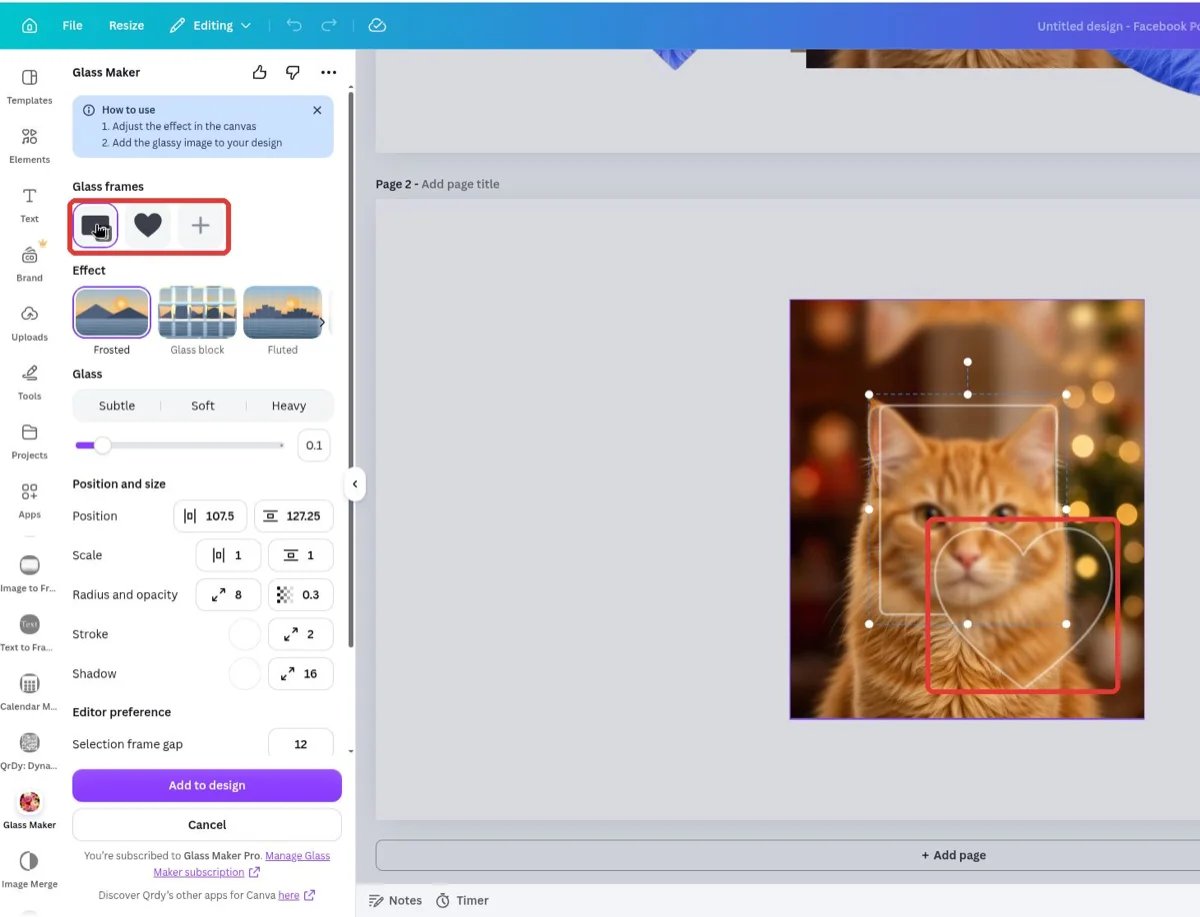
The app overlays an editor on your photo with one rectangular frosted frame in the middle. The panel shows a “How to use” box (1. Adjust the effect in the canvas — 2. Add the glassy image to your design), the Glass frames row, the Effect row, and the settings for the selected frame. Close the hint box with ×.
The editor overlay: default rectangle frame, Glass frames row, and Effect row
3
Drag, scale, and rotate the frame on the photo
Work directly on the image:
Drag the middle of the frame to move it.
Drag a corner handle to scale — both axes scale together.
Drag the rotate handle above the frame to rotate it.
The Position X/Y and Scale X/Y boxes in the panel follow along, and you can type exact numbers into them too. Rotation is only set with the on-image handle — the panel has no angle box.
The frame moved, scaled (1.26) and rotated directly on the photo
4
Fine-tune corners, border, and shadow
Below Position and size you’ll find:
Control
What it does
Radius and opacity
Corner radius (Rectangle frames only) and glass opacity
Stroke
Border color and thickness
Shadow
Shadow color and spread
Selection frame gap
Gap between the dashed selection outline and the glass edge — editor-only, never in the exported image
Press Reset all to default to return every setting to its starting value.
Radius and opacity, Stroke, Shadow, Selection frame gap, and Reset all to default
5
Add more frames with +
In the Glass frames row, press +. A “Choose a shape to add” row appears — tap a shape to add it as a new frame, or press See all for the full grid.
Press + to open the shape picker, or See all for every shape
The All shapes screen lists 12 shapes under Basic shapes — rectangle, pill, circle, ellipse, triangle, diamond, hexagon, star, heart, drop, leaf, and petal. The From your design section lets you scan a vector shape from your page (add it via Elements → Shapes, then press the rescan button).
All shapes: From your design + the 12 Basic shapes
Free plans place up to 2 frames per photo; Glass Maker Pro raises that to 8 and unlocks the 6 organic shapes (Hexagon, Star, Heart, Drop, Leaf, Petal) plus design-shape scanning.
6
Switch between frames with the chips
Every frame is a chip in the Glass frames row. Click a chip — or the frame itself on the image — to select it. The effect and all settings below apply to the selected frame only, so each pane can have its own shape, effect, and look.
Two frames: the rectangle chip is selected, the heart frame sits on the photo
Set Impacts (number of impact points), Intensity, and Frost. Press the shuffle button next to Frost for a different crack pattern — “use the shuffle button to try a different pattern.”
Cracked with Impacts 2, Intensity 0.8, and the shuffle button
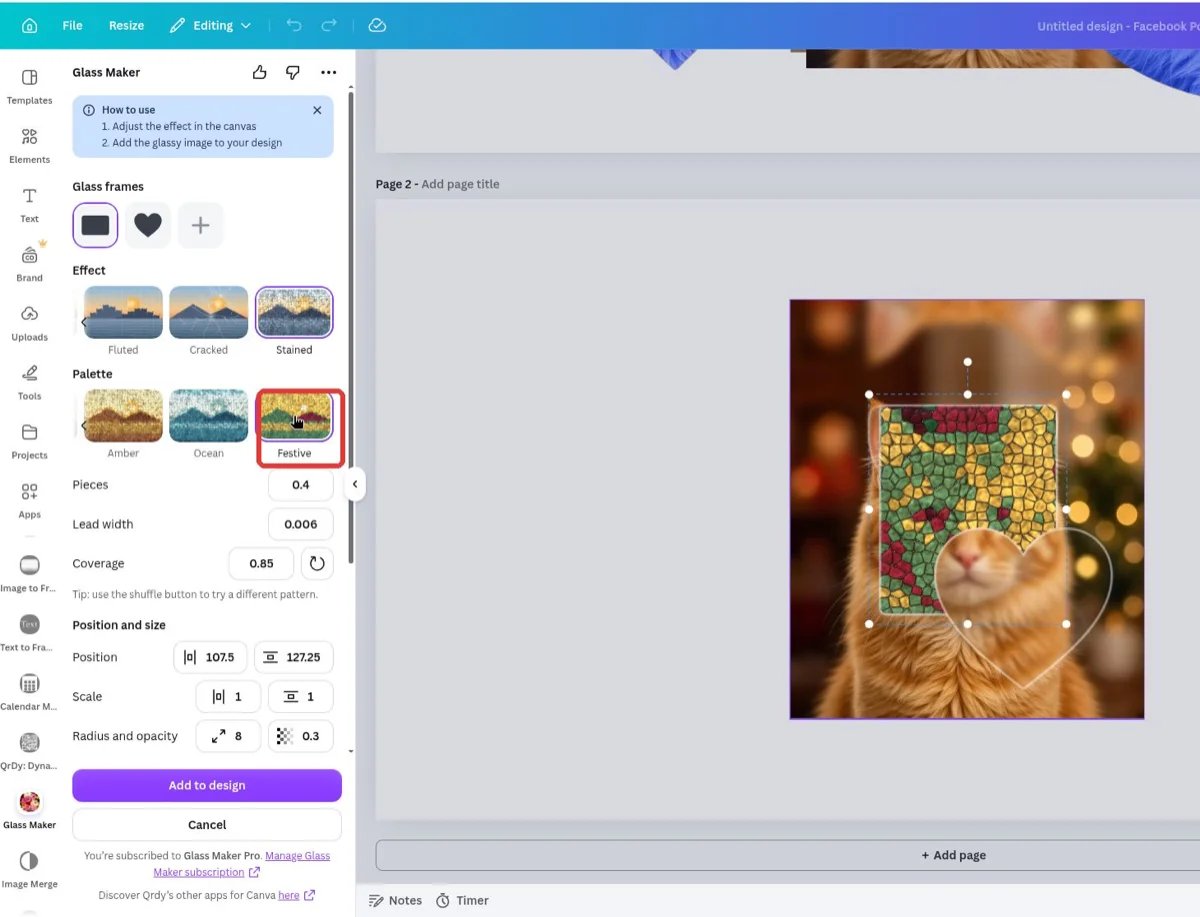
Four palettes: Photo (colors sampled from your image, default), Amber, Ocean, and Festive, with Pieces, Lead width, and Coverage controls and a shuffle button for new piece layouts.
Press Add to design when you’re happy. The app rebuilds the whole result at the photo’s original resolution — no watermark — and adds the finished image to your page. Press Cancel to discard instead. The panel then returns to the Photo glass start screen, ready for your next image.
The finished image on the page: a Stained rectangle and a heart frame
The result is a baked image, not a live effect layer — the app doesn’t remember the settings of an image you added earlier. To change the glass, run the effect again from the original photo.
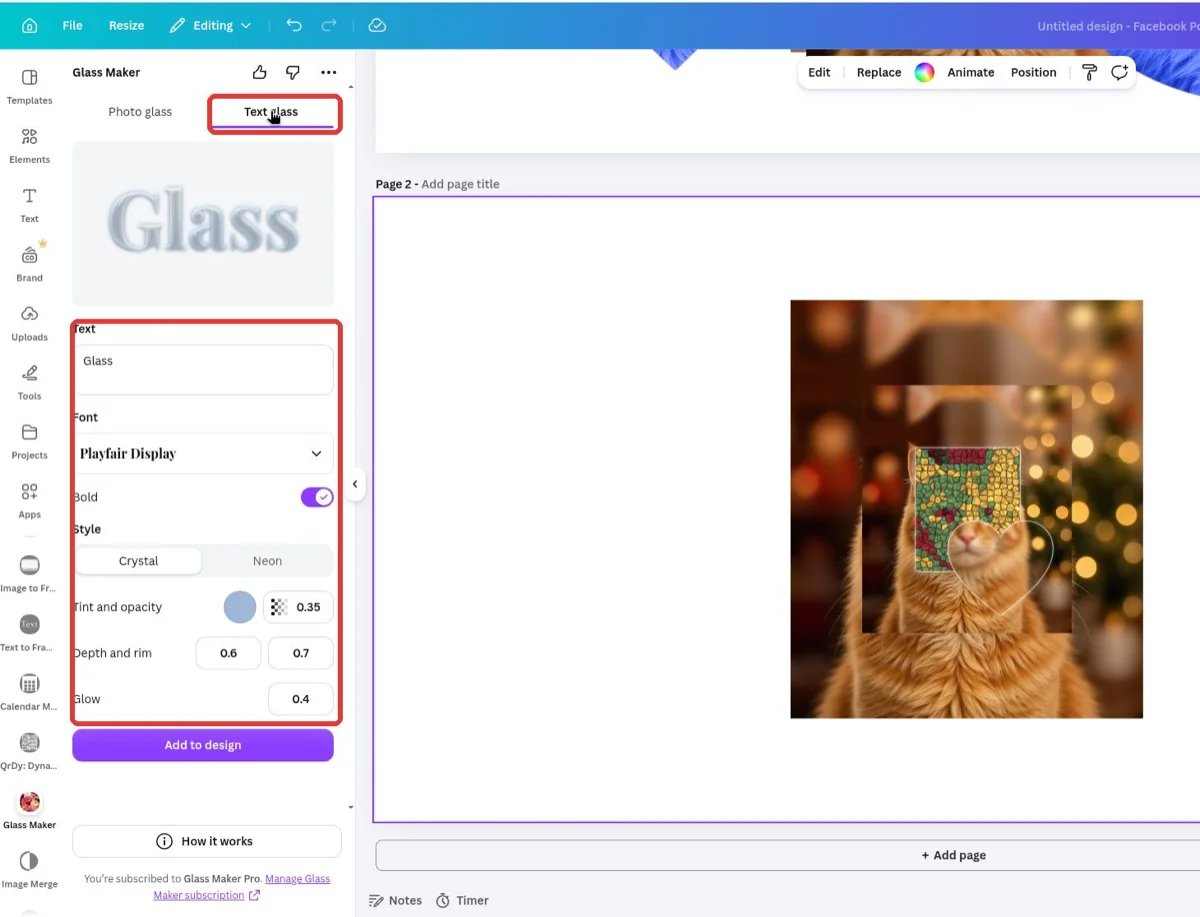
No image needed here. The tab has a live preview at the top, a Text box (default “Glass”), Font, a Bold toggle, Style (Crystal / Neon), and the glass controls.
The Text glass tab with its default preview
2
Type your text and pick a font
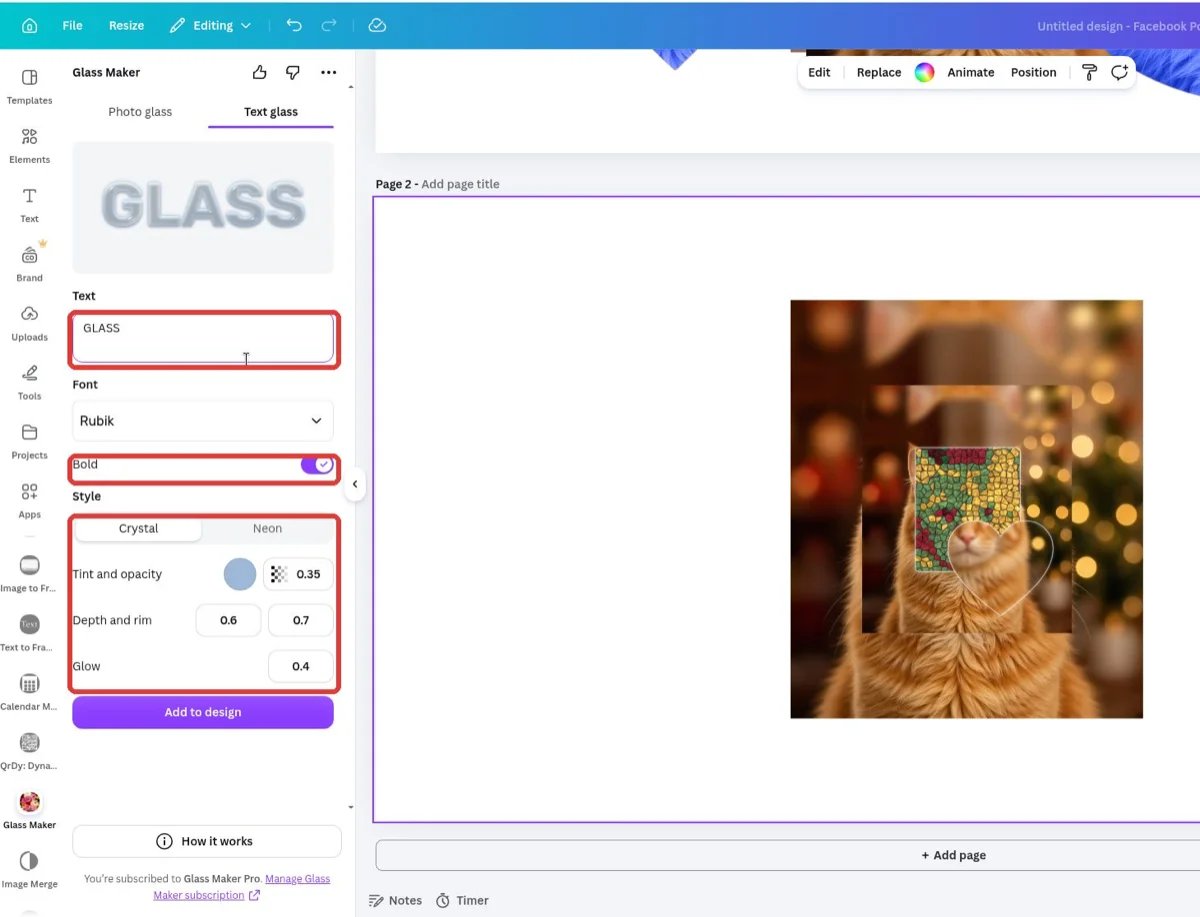
Type into the Text box — multi-line text works. Click Font to scroll a list of 100+ Google fonts (Playfair Display is the default; Raleway, Inter, Roboto Condensed, Oswald, Roboto Mono, Noto Serif, Rubik and more — Vietnamese-friendly fonts included). Toggle Bold for heavier letterforms; if a font has no bold cut, the toggle locks.
3
Style it: Crystal…
Crystal is clear, embossed glass. Tune Tint and opacity (the glass body color and its transparency), Depth and rim (3D depth and edge lighting), and Glow (soft halo). The preview updates about a third of a second after each change.
GLASS in Rubik Bold, Crystal style
4
…or Neon (Pro)
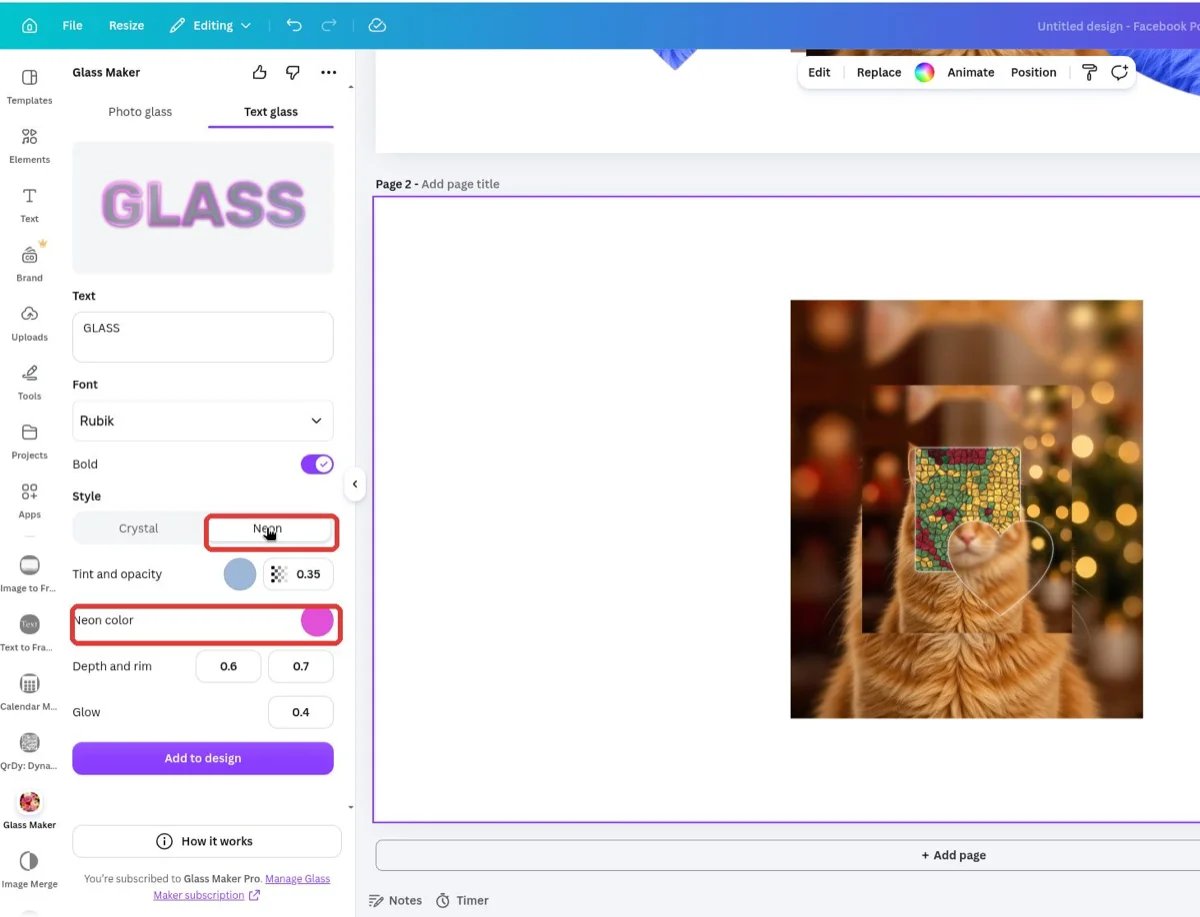
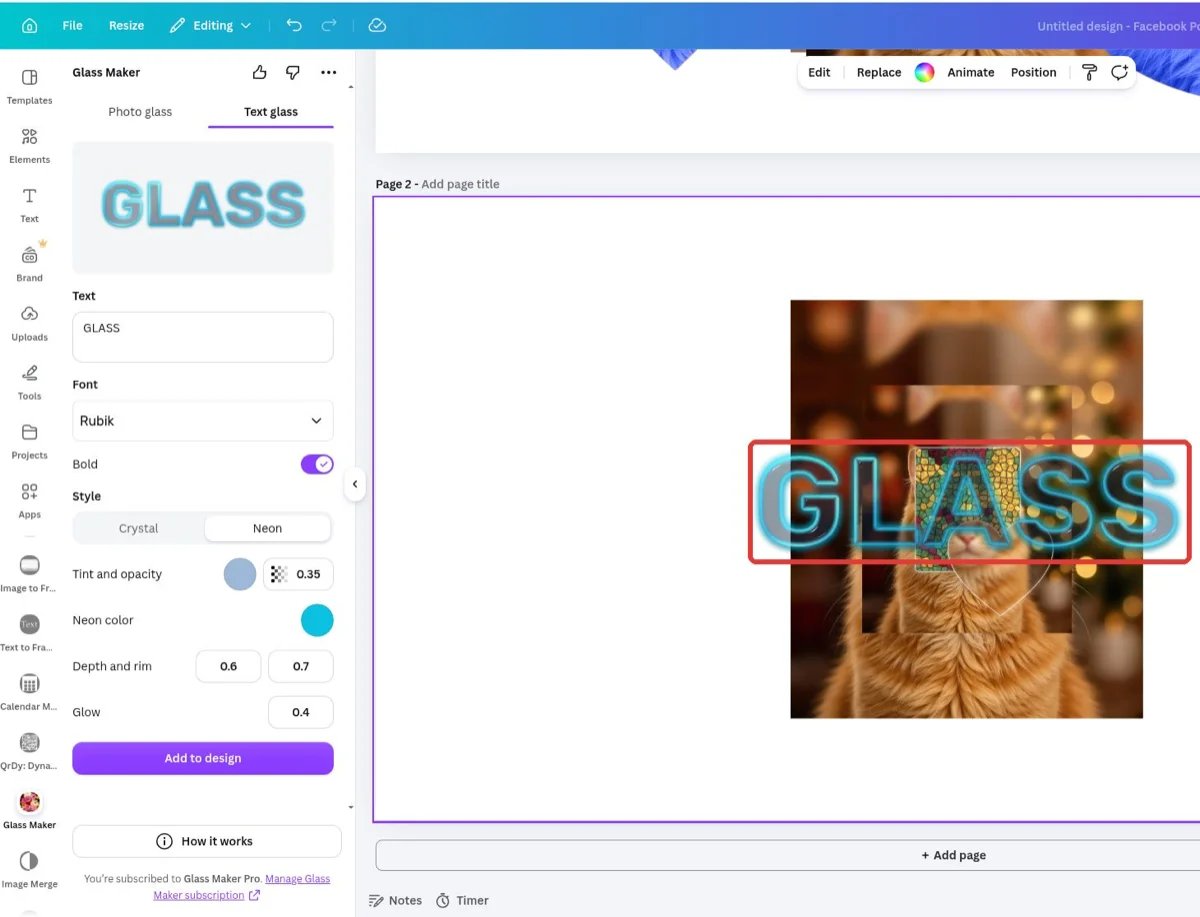
Switch Style to Neon and the letters get a glowing color rim; a Neon color swatch appears — tap it to open Canva’s color picker (design colors, Brand Kit, defaults). The same picker works on the Tint and opacity swatch to change the glass body color.
Neon style adds a glowing rim and a Neon color swatch
5
Add to design
Press Add to design. The lettering is rendered as a transparent PNG and dropped onto your page — place it over any photo or background and resize it like a normal image.
The glass text sits on the photo like any image — background fully transparent
Photo glass only reads images. To put glass on text, stickers, graphics, or a whole composed page:
1
Press Export design on the Photo glass tab
The button sits under “Select an image in your design”, with the note “Your design will be flattened and re-added so it can be detected as an image.”
Export design flattens the page into a single image
2
Choose the export options
A Canva-style export sheet opens: File type (PNG), Size, Quality (Compress / High / Limit size), Transparent background, and Select pages (All / This page / Custom), then Export.
The export sheet: PNG, size, quality, transparency, pages
Options marked with a crown (Size, Quality, Transparent background) are Canva options that may require Canva Pro. The app also recommends avoiding photos that were cropped or flipped inside Canva — use the original image for best results.
3
Run the glass effect on the flattened image
The flattened page is added back to your design as one image. Select it and press Start glass effect as usual.
+ 6 organic (Hexagon, Star, Heart, Drop, Leaf, Petal) + shapes from your design
Effects
Frosted, Glass block (every style and slider)
+ Fluted, Cracked, Stained
Text glass
Crystal, every font and slider
+ Neon
Fine-tuning, Export design, full-res export, no watermark
✓
✓
Everything stays previewable on the free plan — when a Pro feature is active, Add to design is replaced by an upgrade prompt, with an I’ve upgraded — refresh Glass Maker link for after purchase.Pricing (via Lemon Squeezy, separate from Canva Pro): a one-time lifetime purchase or a 24-hour Day Pass — see the Glass Maker Pro page for current prices. There’s no subscription to cancel.
The result is a baked image, not a live effect — rerun the effect from the original photo to change it.
Photo glass has no glass tint. The adjustable colors are the border (Stroke) and the glow (Shadow); tint lives in Text glass.
Glass block and Fluted follow the frame outline — on curved or rotated frames the tiles are clipped along the edge, which is part of the look.
Stained is the heaviest effect; very large photos take longer to rebuild on Add to design.
Ideas: an Apple-style frosted pane under a headline; multi-frame glassmorphism mockups; fluted or stained posters for holidays; a heart or star frame to softly mask part of a photo; Crystal/Neon glass titles over photos.
No image is selected. Click a photo on your page first — the app only detects image elements. For anything else, use Export design to flatten the page into an image.
Is the result editable afterwards?
The output is a finished image. To adjust the glass, run the effect again from the original photo with new settings.
Does the free plan add a watermark?
No. Free exports are full resolution and watermark-free — the free plan simply has fewer frames, shapes, and effects.
Is Glass Maker Pro a subscription?
No. It’s a one-time lifetime purchase (or an optional 24-hour Day Pass) — nothing auto-renews, and the license is tied to your Canva account.
Can I buy Pro on mobile?
Canva doesn’t show payment links on some devices (for example iOS). Open Glass Maker in Canva on a desktop browser to upgrade, then press the refresh link in the app.